Mastering DIY Goat Cheese: Simple Steps to Cost-Effective Chevre
Imagine the rich, tangy creaminess of fresh goat cheese, handcrafted by you in your own kitchen. While it might sound like a task reserved for artisan cheesemakers, learning
how to make goat cheese, or chevre, at home is surprisingly simple, incredibly cost-effective, and deeply satisfying. This culinary adventure not only promises a delicious, customizable dairy product but also offers a peek into the fascinating science behind cheese making. Forget expensive store-bought versions; with just a few basic ingredients and a little patience, you can whip up batches of fresh chevre ready to impress your family and friends and revolutionize your grocery bill.
The process of making goat cheese is far more accessible than many realize, relying on a straightforward 'coagulation' method. This involves combining goat's milk with heat and an acid to encourage the milk proteins to separate into solid curds and liquid whey. These curds are then collected, drained, and seasoned to become your flavorful cheese. It's a fundamental technique that transforms simple ingredients into culinary magic, proving that gourmet flavors don't always require gourmet effort or equipment.
Why Make Your Own Chevre? The Benefits of Homemade Goat Cheese
Diving into the world of DIY chevre offers a multitude of benefits, extending far beyond the sheer delight of a fresh, tangy bite. Understanding these advantages might just be the push you need to start your cheese-making journey.
Unbeatable Cost-Effectiveness
One of the most compelling reasons to learn
how to make goat cheese is the dramatic savings. Store-bought goat cheese, especially artisanal varieties, can be quite pricey. By contrast, the raw ingredients for homemade chevre are relatively inexpensive. A gallon of good quality goat's milk, some citric acid, and salt can yield a significant amount of cheese for a fraction of the cost of its retail counterpart. This economic advantage alone can transform your spending habits, making gourmet flavors an everyday luxury rather than an occasional splurge.
Tailored Flavors and Unwavering Freshness
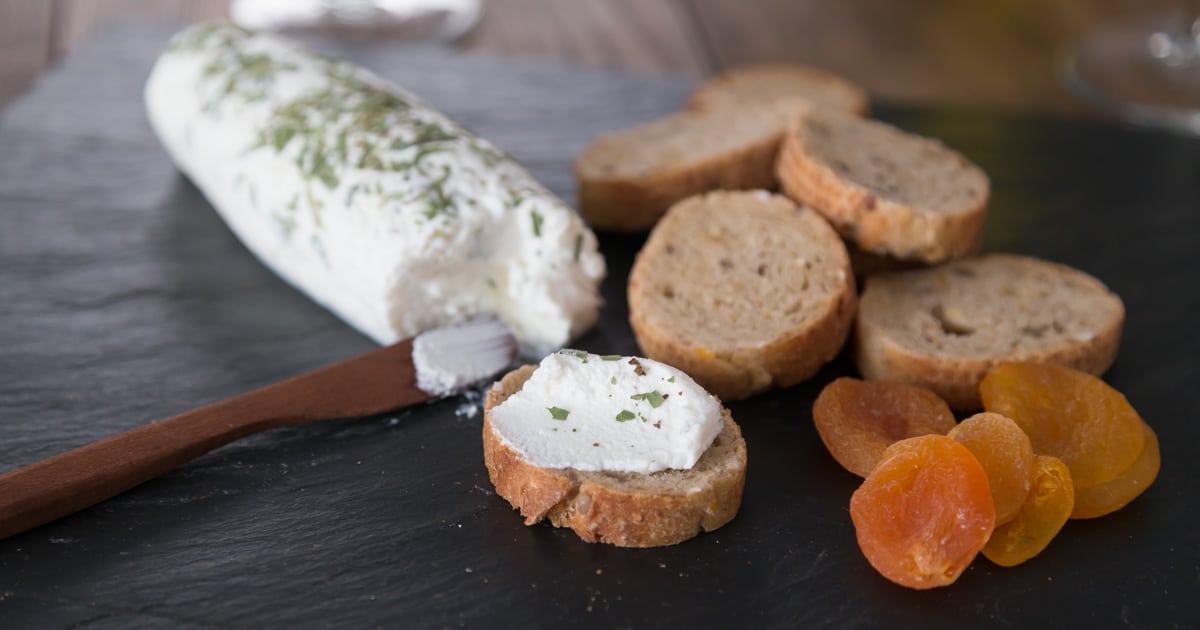
When you make your own chevre, you're the master of its destiny. From the moment it's drained, you can infuse your cheese with a myriad of flavors. Imagine fresh herbs like rosemary, thyme, or chives, finely chopped garlic, spicy chili flakes, or even a drizzle of honey for a touch of sweetness. The ability to customize your cheese means every batch can be a unique creation, perfectly suited to your palate or the dish you're preparing. Furthermore, there's nothing quite like the taste of fresh cheese, made just hours before it graces your table, bursting with vibrant flavors that store-bought versions simply can't match.
Health, Transparency, and Digestive Ease
For many, homemade cheese offers peace of mind. You control every ingredient, ensuring no unwanted additives, preservatives, or artificial flavors. This transparency is particularly valuable for those with dietary sensitivities. Goat's milk, for example, is often easier for some people to digest than cow's milk due to its different protein and fat structure. For more on the fascinating science behind this transformation, you might enjoy reading
Unlock the Science of Goat Cheese: Make Creamy Chevre at Home.
The Joy of the Craft
Beyond the practical benefits, there's an immense sense of accomplishment that comes with making something delicious from scratch. Cheese making, though seemingly complex, is an accessible kitchen skill that empowers you to create and experiment, fostering a deeper connection to your food and a new appreciation for the culinary arts.
Gathering Your Essentials: What You Need to Make Goat Cheese
Embarking on your cheese-making adventure doesn't require a specialty kitchen. In fact, you likely have most of the necessary tools already.
Minimal Equipment List:
*
Large Non-Reactive Pot: For heating the milk. Stainless steel is ideal.
*
Kitchen Thermometer: Crucial for accurate temperature control. A good thermometer is an indispensable kitchen gadget, useful for everything from candy making to roasting meats.
*
Cheesecloth: Essential for draining the curds. This is where the name "cheesecloth" truly makes sense!
*
Colander or Strainer: To hold the cheesecloth while draining.
*
Measuring Spoons and Cups: For precise ingredient measurements.
*
Slotted Spoon or Ladle: For gently handling the curds.
*
Optional: Small Cheese Molds: These are typically small plastic cups with drainage holes, perfect for shaping your chevre into attractive rounds. Otherwise, simply forming a ball in cheesecloth works fine.
Key Ingredients (The Simple Trio):
The beauty of homemade chevre lies in its simplicity, often requiring just three core ingredients.
*
Fresh Goat's Milk:
* Opt for full-fat, pasteurized goat milk. This ensures a good curd set.
* Avoid ultra-pasteurized milk, as its proteins are altered and often won't curdle effectively.
* If you have access to fresh, raw goat's milk from a reputable source, that can also be used.
*
Acid Agent:
*
Citric Acid: This is a common and highly effective acidifier, often found in cheese-making kits. It's what I recommend for consistency.
*
Alternatives: Fresh lemon juice or white vinegar can also be used. Be aware that these might impart a very slight flavor difference to your final product. The acid is what lowers the pH of the milk, causing the milk proteins (casein) to coagulate and separate from the whey.
*
Cheese Salt (or Fine Sea Salt):
* Use a fine-grained, non-iodized salt. Iodized salt can sometimes affect the flavor and, in larger-scale cheese making, interfere with beneficial cultures. Fine sea salt is an excellent readily available alternative.
Step-by-Step Guide to Crafting Your Homemade Chevre
Ready to turn milk into magnificent cheese? Here's how to make goat cheese, step-by-step.
Step 1: Prepare Your Acid Solution
Begin by dissolving the specified amount of citric acid (usually about ¼ teaspoon) in a small amount of cool water (e.g., ¼ cup). Stir until completely dissolved. Precision here is key, as this solution dictates the acidity that will prompt your milk to curdle.
Step 2: Warm the Milk
Pour your goat's milk into your large, non-reactive pot. Add the dissolved citric acid solution to the milk and stir gently to combine. Place the pot over medium-low heat. This is where your thermometer becomes your best friend. Slowly heat the milk, stirring occasionally to prevent scorching, until it reaches a temperature of 185-190°F (85-88°C). The trick is to reach this temperature without letting the milk boil, which can toughen the curds and affect the cheese's texture. Watch closely, as the change can happen quickly towards the end.
Pro Tip: Don't panic if you make a slight miscalculation! As one memorable cheese-making session proved, if you accidentally halve your acid measurements, you can sometimes compensate by adding a little more milk (e.g., cow's milk if you're running low on goat's) to achieve the right balance for coagulation. Embracing flexibility in the kitchen is a true skill!
Step 3: Observe Coagulation and Rest
As the milk approaches the target temperature, you'll begin to notice the tell-tale signs of coagulation. The milk will start to look slightly chunky, with distinct white solids (curds) separating from a clearer, yellowish liquid (whey). Once the temperature is reached, remove the pot from the heat. Give it a gentle stir, then let it stand undisturbed for about 10-15 minutes. This resting period allows the curds to fully form and firm up. You'll see beautiful, soft white curds resembling small-curd cottage cheese, suspended in the translucent whey.
Step 4: Drain the Curds
Line a colander with a double layer of cheesecloth and place it over a large bowl (to catch the whey). Carefully pour the entire contents of your pot – curds and whey – into the cheesecloth-lined colander. Allow the curds to drain at room temperature for 30-60 minutes initially. The longer you let it drain, the firmer your cheese will become. For a creamy chevre, less draining time is needed; for a firmer, sliceable cheese, extend the draining. This step is where you truly control the final texture of your chevre.
Step 5: Salt and Flavor
Once the curds have drained to your desired consistency, carefully transfer them from the cheesecloth into a mixing bowl. Now, it's time to season! Add your cheese salt (start with about ½ to 1 teaspoon per gallon of milk, then adjust to taste) and any desired flavorings. This is your chance to get creative: stir in fresh chopped herbs (like chives, dill, or parsley), a pinch of black pepper, a touch of garlic powder, or even a swirl of local honey. Gently mix until everything is evenly distributed.
Step 6: Shape and Final Drain (Optional)
If using cheese molds, spoon the seasoned chevre into them, gently pressing it down. You can also gather the cheesecloth around the curds, twist it tightly, and form a ball. Place the molds or cheesecloth-wrapped ball in the refrigerator, ideally on a rack over a plate, to allow any remaining whey to drain for several hours or overnight. This final draining helps the cheese firm up further and develop its characteristic shape.
Customizing Your Chevre: Beyond the Basic Batch
Once you've mastered the basic process of
how to make goat cheese, the real fun begins with customization.
*
Savory Sensations: Mix in sun-dried tomatoes, black olives, finely diced roasted red peppers, or a blend of Italian herbs. A touch of smoked paprika can add depth.
*
Herbaceous Delights: Herbs de Provence, fresh basil, or even a pinch of za'atar can transform your chevre into an exotic treat.
*
Sweet Surprises: For a delightful dessert cheese, stir in a spoonful of honey or maple syrup, add a sprinkle of lemon zest, or fold in some dried cranberries.
*
Serving Suggestions: Homemade chevre is incredibly versatile. Spread it on crackers or crusty bread, crumble it over salads, melt it onto bruschetta, or use it to fill pasta. For more inspiration on customizing your fresh cheese, check out
Homemade Goat Cheese: Easy 3-Ingredient Chevre Recipe.
Learning
how to make goat cheese is an immensely rewarding culinary skill. It's a journey that demystifies a gourmet product, puts you in control of your ingredients, and opens up a world of flavor possibilities. From the simple act of heating milk to the satisfying taste of your homemade chevre, each step is a testament to the magic of transformation in your kitchen. So, gather your ingredients, embrace the process, and prepare to delight in the fresh, tangy taste of your very own cost-effective, customizable chevre!